There can be no doubt now that disc brakes on road bikes are here to stay. Debate raged for a good few years over whether disc brakes were better than rim brakes and whether they even had any place at all on sleek road bikes, but with discs having been used on the majority of WorldTour bikes for the last couple of seasons, it’s fair to say the debate is over. Disc brakes have won.
The overwhelming majority of road bikes on sale today are equipped with disc brakes, with only a few models at the lower end of the price scale specced with rim brakes (and a tiny, rapidly decreasing, number of high-end bikes). Contrast this situation with 2016, when the UCI suspended the use of disc brakes in professional races and British Cycling wouldn’t allow amateurs to use discs in domestic racing. In the conservative world of bike racing, the switch to the now universal use of disc brakes has been pretty rapid.
All three of the big groupset manufacturers now put the emphasis firmly on disc brakes within their ranges. Although Shimano, SRAM and Campagnolo still list rim brakes, it's clear that all the development and energy have gone into the disc brakes with the rim options perhaps best described as ‘legacy’ products included for completeness; it’s certainly the case that you’d be hard-pressed to buy a brand new SRAM RED equipped bike with rim brakes for example.
So, with the battle of the brakes effectively over, let's have a closer look at disc brakes, how they differ from rim brakes, how they work, their advantages, their disadvantages and how to look after them so they perform optimally.
Disc brakes vs rim brakes: what's the difference?
Rim brakes vs disc brakes
(Image credit: Tim Russon)
Back to basics: A rim brake uses a lever to pull a steel cable that causes a caliper to push two pads onto the wheel’s rim so that the friction slows the bike down. A disc brake has a lever that pushes hydraulic fluid down a hose that moves two pads onto a hub-based rotor (or disc) to achieve deceleration, the same as on a car or motorbike.
Cable-operated disc brakes also exist, which work in a hybrid fashion, using a steel cable to apply the pads to the rotor. These offer some of the advantages of hydraulic disc brakes with the simpler roadside maintenance of rim brakes. They are also significantly cheaper than hydraulic systems. These two factors make them a decent option for adventure riders who will not have the luxury of a well-stocked workshop and more budget-orientated bikes.
All road bike disc brakes use a 2-piston (or 2-pot) design in which a single piston on either side of the caliper is pushed inwards and onto the rotor by the hydraulic fluid. Whilst some mountain bike brakes use more pistons to achieve greater power, this isn’t deemed necessary on a road bike. The rotor size can vary though, with usually either 140mm or 160mm being used.
The bigger the rotor, the greater the stopping power and the better the heat dissipation, so smaller riders might choose 140mm whilst larger riders or those who ride in the hills a lot might prefer the larger option. On new bikes, 160mm is the standard for the more heavily used front brake and whilst some models do feature a 140mm rear, 160mm is the more usual rear option too.
What are the advantages of disc brakes?
Disc brakes offer many improvements over rim brakes, some directly connected to braking experience and other more wide-reaching advantages that may not be quite so obvious.
Direct advantages
First and foremost, a hydraulic disc brake provides more power for less effort than a rim brake. Mountain bikers were quick to realise this years ago, and so the days of screaming forearms halfway down a long descent on a V-brake-equipped bike were rapidly banished to the history books. There is no doubt that a well set up rim brake provides plenty of power to lock the back wheel up, but the big advantage of disc brakes is that the finger strength needed to do this is much less, so super steep Lake District hills and long, hairpin-strewn alpine descents can be tackled without needing superhero strength.
We all gain from this, but smaller, weaker riders in particular benefit hugely, especially as sufficient power can usually be generated from the hoods rather than having to reach for the drops for more leverage every time the road goes downhill.
Disc brakes give extra confidence when descending
(Image credit: Tim Russon)
The second major benefit of disc brakes is their consistent performance in all weather conditions. Many of us will have experienced that heart-lurching moment as we barrel towards a corner in the rain and pull the brake lever only for nothing to happen for the first second as the pads contact the wet rim and clean off the water before they can bite. Double the adrenaline spike if using carbon rims!
Partly because of their location further away from the road spray, but mainly due to the materials involved, steel rotors and disc brake pads work superbly even when covered in water or mud; again, off-road riders were swift to take advantage of this on mountain bikes and latterly, gravel bikes.
Disc brakes are ideal for wet weather
(Image credit: Tim Russon)
Last on the list of direct benefits, is that disc brakes are easier to modulate when you are in the braking zone. The extra power and consistent ‘lever feel’ of a good hydraulic system make it significantly simpler to apply just the right amount of pressure to slow down without locking the wheel or not slowing down in time. Mid-braking adjustments are also better, allowing you to ease off a little or pull slightly harder when necessary.
Indirect advantages
When using rim brakes, especially off-road or during the winter, the rim or even the wheel, becomes a consumable item. The necessary friction between the pad and the rim wears both the pad and the rim down. In bad conditions, this can happen at quite an alarming (and costly) rate. As the rim has to have sufficient material to cope with this wear for a reasonable length of time, be strong enough to cope with the compression forces of the brake caliper and the outward pressure of the inflated tire, rim brake wheel rims need to be strong.
Conversely, a disc brake wheel doesn't wear out the rim and only needs to resist the forces from the tire, so can be lighter; if you ever need to replace a rotor, it is significantly cheaper than all but the very cheapest of wheels. It is also more palatable to spend money on a great wheelset if you know it isn’t going to get worn away in a season or two.
SRAM RED rim brake
(Image credit: Tim Russon)
Removing the need to provide a platform for the rim brake caliper has allowed frame designers to explore more advantageous shapes and carbon layups, such as leaving greater clearance for wider tires and more forgiving seatstays. Although disc frames were originally a couple of hundred grams heavier than the rim brake equivalents, that difference has now been almost completely eroded as the technology and understanding have improved and disc brake bikes are now on a par aerodynamically with rim brake bikes too.
Rim brake cables and mechanical gear cables need to run in nice, smooth paths from the levers or shifters to the calipers or derailleurs to work properly. Electronic wires (or wireless shifting) and hydraulic hoses are far more forgiving in this respect and have allowed designers to integrate and hide them inside the handlebar, stem and frame for less drag and a cleaner aesthetic (just don’t mention ease of maintenance…).
Cervelo S5 with a clean, aero front end thanks to disc brakes
(Image credit: Tim Russon)
Speaking of maintenance, disc brakes typically don't need much in terms of servicing day-to-day. As a sealed system, they should work consistently and reliably without the need to constantly tweak them, adjust the cable, recenter the caliper or realign the pads…
What are the disadvantages of disc brakes?
…however, when a disc brake does need some TLC, it can be a messier and more time-consuming affair than sorting out a misbehaving rim brake. It’s perfectly possible to replace a rim brake cable by the side of the road whereas a hydraulic brake bleed requires specialist tools and potentially hazardous fluid. Luckily this shouldn’t need to be done frequently.
Initial setup is more particular for disc brakes, with the narrow tolerances making it a little harder to ensure that there is no brake rub, even on a brand-new bike. These tight tolerances mean that the brakes are very sensitive to any alignment issues, whether caused by slightly out-of-true rotors, uneven piston advancement / retraction or even badly faced caliper mounts on the frame. The latest Shimano hydraulic disc brakes promise greater pad clearance, which should make setup easier, but getting perfect alignment can sometimes feel a lot more like an art than a science!
Squealing brakes seem to be more prevalent in disc brakes than rim brakes, although neither system is immune from this. Causes of squealing disc brakes can be misalignment, contamination of the pads and rotor or even just road spray on the braking surfaces.
Tight clearances on an Ultegra caliper
(Image credit: Tim Russon)
All things considered, I think that it’s still fair to say that disc brake bikes carry a slight weight penalty compared with rim brake bikes, but it is very hard to make a direct comparison and there is certainly no difficulty in getting either type of bike down below the UCI limit of 6.8kg. Indeed, the 2023 UK National Hill Climb Championship was won by Andrew Feather on a disc brake bike weighing less than 6kg. In more regular riding scenarios, it’s well-documented that aero trumps low weight so there is no need for us mortals to worry about a few extra grams from disc brakes considering the performance benefits offered elsewhere.
Cost is sometimes cited as a disadvantage, but I don’t think this holds up to scrutiny - a Dura-Ace rim caliper is actually slightly more expensive than a disc caliper. Granted, branded disc pads are more expensive than the rim equivalent, but they should last much longer too, and as discussed above, you don’t have the problem of wearing out the wheel’s rim either. Plenty of aftermarket brands offer suitable pads at lower prices, though, so it is worth shopping around.
It also isn’t really possible to mix and match between brands; a Shimano caliper needs a Shimano lever and so on, but these days I’m not sure how much of a disadvantage that is as we become more used to proprietary components and full integration.
Basic maintenance and adjustment
A good starting point for setting up your disc brakes is to loosen off the two bolts that secure the caliper, make sure that the caliper is ‘free-floating’ and then pull the relevant brake lever to apply the pads to the rotor. This should self-align the caliper and pads to the rotor, so all you need to do now is tighten up the bolts whilst still holding the lever. It can sometimes be useful to put a piece of thin card either side of the rotor where the pads contact it to add a bit of extra clearance. You can also cut out a bit of a drinks can for this purpose, or there are specific tools available for this too.
Most decent hydraulic brake systems offer bite point and reach adjustments, so these can be set to your preference. Reach is the distance between the brake lever and the handlebar, so smaller hands will need the lever closer to the bar whilst larger riders might prefer the lever to be pushed outward so it sits comfortably under their fingers. It is usually adjusted using an Allen bolt, but make sure that there is still sufficient pull to actuate the brakes fully before the lever hits the bar.
The bite point is the point in the lever’s stroke where the pads touch the rotor. It is purely down to personal preference again, with some riders preferring a very short stroke so the pads impact the rotor almost immediately whilst others like the bite point to be much closer to the bars so that their fingers are more fully wrapped around the levers. Have a play with both settings and find out what works best for you.
SRAM RED rear disc brake
(Image credit: Tim Russon)
Disc brake pads wear down, just like rim brake pads, but due to their location, it can be much less obvious so you should make an effort to have a close look at them every few rides and check that there is enough material left. You might get some indication that they are running low if the lever pulls closer to the bar or power seems to be lacking, but you want to ensure that you change them before they are down to the metal backing plate as that can damage the rotor and certainly won’t be as effective at stopping you!
Pad replacement is usually very quick and simple; undo the retaining pin, pull out the old pads, slide in the new pads and replace the retaining pin. You will need to push the pistons back in to make room for the new pads using a pad spreader tool (or plastic tire lever) as the pistons push further out of the caliper as the pads wear down.
It’s a good idea to make sure that you clean off any grime that has accumulated on the visible, external part of the piston so you don’t get that dirt into the caliper when you push the pistons back in as this could cause sticky pistons that won’t work evenly and smoothly. This should be done with a specific brake cleaner that won’t cause contamination.
The rotor can wear down too, but this takes a very long time; if you can feel a significant lip on the rotor, or there are grooves worn into it then it probably needs replacing.
It is well worth checking frequently that the pads are centered and retracting properly before riding; nobody needs the extra drag of a rubbing brake pad on their ride. Just lift the bike up and make sure that both wheels spin freely.
Sometimes, the discs and/or pads might get contaminated with a substance that affects their performance. Perhaps a bit of chain oil has splashed onto them, some GT85 or even some brake fluid. If you think that this is the case then use some isopropyl alcohol or a brake cleaner on a cloth to thoroughly clean all the surfaces. In the worst cases, it might be necessary to change the brake pads completely.
If air gets into the hydraulic system or the brakes just feel a bit ‘spongy’, then it might be time for a bleed. Each brand of brake has to be done slightly differently, so consult their instructions, but essentially you are removing air bubbles and pushing new fluid into the system. This should not be a frequent task, and as it requires a few specialist, brand-specific bits of kit you might prefer to just ask your local bike shop to do it for you.
If you do have a go yourself, then the most important thing is to use the correct hydraulic fluid as the two options are NOT interchangeable. The seals won’t work with the wrong fluid and could cause catastrophic failure. SRAM uses DOT 5.1 fluid whereas Shimano uses mineral oil. And don’t forget to dispose of the old fluid correctly.
Thank you for reading 20 articles this month* Join now for unlimited access
Tim Russon is a writer and photographer who has worked in the outdoor and cycling industry for over 20 years. He can’t remember a time when he didn’t own a bike and has road, gravel, mountain and retro bikes in the shed. His favourite place to ride is the Dolomites, a simply stunning area which has breathtaking views and incredible roads combined with lovely food and great wine.
He prefers long, hot climbs in the big mountains, but as he lives on the edge of the Peak District he has to make do with short, cold climbs most of the time instead.


 £500k worth of bikes, clothing and accessories up for auction after Leeds shop closure
 Rapha lays off employees, closes North American office

 Made in the USA: Four of the best domestic carbon bicycles you should know about
 The best bike multi-tools 2024: Function-packed tools for every ride
 Best handlebar bags 2024
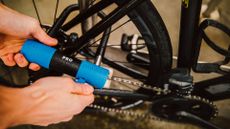 Best bike locks 2024: heavy duty and portable locks for keeping your bike safe
 Best protein-loaded recovery drinks for cycling 2024 rated and reviewed
 Best road bike wheels reviewed and rated: disc and rim wheelsets to supercharge your ride
 Best cycling vests 2024: extra warmth when you need it
 Best aero bikes 2024: fastest speed weapons ridden and rated


